Thursday, 13 February 2014

Overcoming the First Hurdle

http://what-it-takes-to-be-a-hurdler.blogspot.ca/2012/08/physical-attributes-of-hurdler.html
Image Source: The Perfect Athlete
We've alllllll been there. You start a new "heathy eating" regime and you tell yourself, NO MATTER WHAT, you're going to stick to it. For about two weeks, you do stick to it. In all honesty, the first two weeks are easy. You turn down the office treats, you make your lunch every day, and you work out hardcore. Things are going GREAT.

Then...real life happens. It comes along when you least suspect it and BAM throws you off the path you have so successfully made for yourself. It can happen in many forms. Some of my key hurdles include:
  • Dinner with friends
  • Aunt Flo comes to town (yes, I'm 90, leave me alone)
  • Your favourite baker brings in delightful cupcakes that you can't turn down
  • I'm sad
  • I'm happy
  • I'm tired
  • A holiday happens
  • I'm too hungry and just grab the closest thing
Anyway, you get the idea. You're cruising along, with your healthy food and your exercise routine and your happy feelings and then out of nowhere, you're blindsided by a hurdle. You try and jump over it, but you trip, and you're left face down on the ground with a bag of chips and a bottle of wine (hypothetically speaking of course). You wake up the next morning with a bloated belly and a bruised ego.

Then the guilt sets in..."Why did I let myself do that?" or "I'm such a fat ass" or the worst one "well, this week is a write off, we'll just have to start again next week"

You all know what I'm talking about too. It really, really sucks.Then, you have a moment where you go "is it even worth it? I don't really care what I look like. F*ck it, I'm going to eat whatever I want" and then you start RIGHT back where you started. Guilty, sad, discouraged and frustrated.

So how do you overcome this? Logically, when you hit your first hurdle, you pick yourself up and keep going. Does that happen? Sometimes, yes, but when it doesn't, here is what I suggest:

When you START your Healthy Living Journey:
Write down your feelings & emotions as to WHY you're starting this healthy living journey. Is it because you're feeling fat? Is it because you want to cut crap out of your life? Whatever it is, write it down. Then, throughout the first few weeks, write down any and all changes you feel within yourself. Maybe it is more energy, more confidence, better sleep...whatever. WRITE IT DOWN.

Then, when your first hurdle comes along and you feel the guilt seeping in, immediately pull out that note and re-read it. Remember WHY you started this in the first place. Remind yourself of your goals and how good you were feeling.

You see the hurdle up ahead and you're worried about smacking into it:
You're two weeks in. You have a CRAZY awesome food fest coming up (like perhaps an amazing Raclette dinner with girlfriends) and you know you're going to want to splurge. Options:

a) eat beforehand and politely decline to eat
b) gorge until your gut busts out
c) prepare by doing a workout beforehand
d) cancel

In all honesty - my usual go to would have been b) or d). Obviously I would never decline to eat (that's just crazy) and my anxiety over the whole thing may cause me to cancel. Not this time though...I worked out the night before, and I knew I was going to the day after, so I happily indulged in an amazing meal. For those who don't know about Raclette, this is what it may look like:


Special cheese, fatty meats, potatoes...magic. We also happened to be celebrating a VERY special happening for a girlfriend of mine. It was a spectacular meal where I at until I was comfortably full and fully satiated. I may have felt a teeeeeensy bit guilty (we'll get to that next) but mostly, I was content.
Love these girls!
You've already started & can't remember why you're doing this:
Okay...this is where I'm at right now. I know why I'm doing this, I do, but there is that tiny (large) part of me that wants to throw my hands up in the air and bust out a bag of chips.

Then, I took a step back. I realized that this whole "clean living challenge" that I'm doing, is actually something I want to stick with for the rest of my life. So, for the rest of my life, am I going to be perfect 100% of the time in my eating? NO! Am I going to have girls nights, be happy, be tired, be lazy, have holidays etc. in the next part of my life? I certainly hope so! So guess what? It's okay to have treat days, once a week. It's okay to "fall off" the horse. The main thing is, you start the next day as a fresh day. You can't change what happened the day before, buy you can sure as heck try again!

The moral of the story? Don't give up. If your goals are genuine & your intention is strong, you will do it! This whole thing is a life journey. You're learning how to eat properly for the rest of your life, NOT just to get to your goal weight. You will get there!

Do you have any tips? Please share them below! I'd love to hear about them!

Monday, 10 February 2014

Do-it-Yourself Oreos

I really love Oreos. I'm not sure what it is about them, but whenever they are in the house, I can't help myself from eating them. ALL of them.

However, since starting my Clean Living Challenge (which is going great so far!) I've had to cut back/cut out any junk food that I didn't make myself. The solution? Make my own Oreos! Of course I headed over to the trusty Pinterest (remembering I had seen them on there before) and found this recipe. 

One note: I found this dough completely frustrating to work with. It kept ripping and splitting apart (might be something to do with the fact I don't have a rolling pin and had to use a glass to roll the dough out...naaaaaaah) but the end product was TOTALLY worth it.

I also don't have a 2" cookie cutter like the recipe suggested, so again, I used a class to cut out the circles (which ended up being more like 3") so they were bigger and I should have been baked a little longer than the suggested 12 minutes. In the end, mine were a little soft. Didn't make a difference to me though, these things are epic!

   Do-it-Yourself Oreos
adapted from My Kitchen Addiction
Ingredients:

For the Cookie :
1 cup (2 sticks) salted butter, softened
1 cup granulated sugar
1 egg
1 tsp vanilla
2 cups all purpose flour
3/4 cup cocoa powder
1 1/2 tsp baking powder
1 tsp salt

For the filling:
1/2 cup salted butter (softened)
2 tbsp 10% cream
1 tsp vanilla
pinch of salt
3 cups icing sugar

Method:
In a mixer, cream together the butter and sugar on medium speed until nice and fluffyAdd the egg and vanilla and continue to mix until everything is combined.

In a medium bowl, whisk together the flour, cocoa powder, baking powder and salt until evenly mixed. With your mixer on LOW, slowly add the dry ingredients a little bit at a time. Add until everything is JUST mixed. I found that my mixer didn't get everything quite mixed, so a kneaded it together a little bit with my hands.

Divide the dough into 2 even sized discs, wrap separately in plastic wrap and place in the fridge for 1 hour.

When the hour is up, remove 1 disc & preheat the oven to 350 degrees F. Line a couple of baking sheets with a baking mat or parchment paper. On a lightly floured surface, use a rolling pin (or in my case, a Canadian Club glass) and roll the dough out until it is about 1/8-1/4" thick. Use a cookie cutter that is about 2" in diameter to cut out the circles & transfer to your mat. Roll up the scraps & continue until you're almost out. Continue until you have used up both discs of dough (you may have a little left over which you can re-shape into a basic cookie!)

Bake in the oven for about 12 minutes. If your cookies are thinner, you won't need them to bake as long as the thicker ones. I baked mine (3" across) for 12 minutes and they came out a little soft, but I liked them that way! When they are done, transfer them to a cooling rack to cool COMPLETELY.

While the cookies are cooling, it's time to whip up the icing! In the bowl for your stand mixer, use a hand mixer to combine the softened butter, cream, vanilla and salt until all combined. Add your bowl to the stand mixer and set the speed on low. SLOWLY start adding the icing sugar bit by bit and watch it come together. This icing is quite stiff once it is all finished, but that's what you want!

Put the icing in a piping bag fitted with a large round tip or flower tip (which is what I used). Pipe onto one cookie and finish everything off by adding a cookie to the top! VOILA! You've made your own Oreo!

Enjoy with a tall glass of milk, these things are decadent!

 Follow me on Facebook, Twitter & Pinterest too! 

Thursday, 6 February 2014

Tabata - A Quick & "Easy" Indoor Workout

I posted last week on my FB page for people to "Like" a status if they wanted a post on a quick & effective workout, so here it is! I don't have pictures of each exercise, so I'll post pictures that I've found online and link to the page that they come from.

**DISCLAIMER** I'm by NO MEANS a fitness instructor (except for Zumba) and as with any exercise, you should consult with a physician if you think any of this will be too intense for you. However, if you have no injuries and are in relatively decent shape, you should be able to pound this routine out, NO PROBLEM!

First - The program I'm going to tell you about follows the method of TABATA. I first learned about Tabata when I attended the CanFitPro conference two years ago in Toronto, where my friend took a class with Mindy Mylrea and left said class sweating, shaking and grinning like a loon. Shortly after, I tried it at one of HER classes and been hooked every since.

Tabata is a form of the high intensity interval training method (or H.I.I.T) that can offer more health benefits than traditional cardiovascular exercise. I personally like it because it’s short, efficient and can fit in almost any fitness program. No equipment is required, no skill level is required and the whole thing takes about 25 minutes from start to finish.

Any exercise can be incorporated into the Tabata training. However the basic outline of the Tabata training method are as follows:
  • One "Set" is 4 minutes long
    • 20 seconds of intense training (meaning that for 20 seconds you give your ALL, whatever that means for you)
    • 10 seconds of rest 
    • Total of 8 rounds per Tabata set
Now in my friend's class (and when I do this at home) we do 4 Tabata Sets (for a total of 16 minutes of intense exercise) plus a 2-5 minute warm-up and a 5 minute cool down for a total of about 25 minutes. A TRUE Tabata set is the same exercise for the full 4 minutes, but I get bored easily and like to switch it up (which is what I'll tell you about here).

Also, I highly recommend downloading a free Tabata Timer on your phone/iPad/tablet or whatever. Trying to do it with just a timer is frustrating (especially when you have sweat dripping in your eyes). I use this one and like it very much.

Now, pick your fave, pump-up playlist, and get ready! I've done this set and it is challenging. Go at your own pace, but push yourself a little bit too. It's okay if you can't to the exercise full throttle the whole time, just keep movint!

 Here we go...

(Go HERE for a picture-free version of this post!)

Warm-Up (do this twice):
25 Jumping Jacks
20 Squats (quick ones)
10 Burpees

Set 1 (Legs & Cardio):
Remember, 20 seconds on, 10 second off per minute. 
1st & 3rd Minute - FROG SQUAT
http://sweatandstamina.tumblr.com/post/49403726470/the-ultimate-squat-guide
Image from Sweat & Stamina
2nd & 4th minute - Mountain Climbers
Image from Shape Magazine
REST FOR 30 SECONDS

Set 2 (Legs, AGAIN):
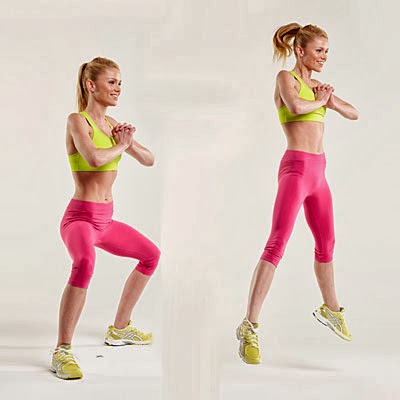
1st and 3rd Minute -Ski Moguls
http://www.shape.com/fitness/workouts/home-tabata-workout-blast-fat-4-minutes/slide/5
From Shape Magazine
2nd and 4th minute - Lunge Jump
Keep in mind, if this is your first time doing this workout, you may be feeling out of breath and tired at this point. If you are, don't force yourself to do the jump in the middle. You can just step back and lunge with the other leg. Whatever is most comfortable for you! 
http://www.womenshealthmag.com/fitness/lunge-jumps
From Women's Health Magazine
REST FOR 30 SECONDS - You're halfway there!

 SET 3 (Abs & Arms):
Switching it up here, I'm going to do 4 different exercises!
First Minute - Bicycle Crunch
Women's Health Magazine
 2nd minute - Tricep Dips
You can do these like below or using a chair/bench or any other sturdy surface
FitSugar
 3rd minute - Double Crunch
Click HERE for a really good tutorial
 Fourth Minute - Downward Dog Push-Ups
These are BRUTAL, but they are also awesome
Equinox
REST FOR 30 SECONDS

SET 4: Full Body
1st & 3rd Minute - Spider Man Abs 
Glamour Magazine
Description from Glamour Magazine: Start in push-up position with hands directly below shoulders. Pull right knee out to the side, hovering toward the right elbow, as shown. Return to start and repeat on opposite side.**IF YOU CAN** Add a push-up in the middle.

2nd & 4th minute - Cross Knee Plank
From Glamour Magazine
Description from Glamour Magazine: Starting in push-up position, bend and lift left knee, bringing it across body toward right elbow, as shown. Return to start and repeat, bringing right knee to left elbow.

YOU'RE DONE! 

Cool Down:
I'll  admit, when I do this on my own, I'm bad and don't usually stretch & when I do, I don't really have any sequence for them, so I reccomend you head over to FitSugar for a great sequence of stretches. You can also do whatever you feel is best for you!

I hope you enjoyed this workout, I know I sure do! If you have ANY questions at all, please, please, please feel free to leave a comment below. I'd LOVE to hear from you!